When I set out to build my new speaker system, I had one clear goal: Create something that could compare with modern smart speakers. Not just in sound quality, but in every aspect of the user experience. The traditional DIY approach would be straightforward: Buy separate off-the-shelf components and wire everything together with analog switches, relays and knobs. It works, but it feels … homemade. You end up with a speaker that operates like it’s stuck in the past. What I really needed was a smart, connected system with the polished experience of premium devices. This meant digital control of every component, opening up intelligent behaviors impossible with analog circuits.
After searching for commercial solutions that could deliver this integration level for DIY projects, I found nothing on the market. What emerged was a modular system, with individual “bricks” handling specific functions while communicating digitally with each other. So, the AudioBricks system was born.

Bluetooth Speakers
Portable Bluetooth Speaker system for my scouts-organization, based on AudioBricks.
PowerBrick
The PowerBrick takes the raw power from the battery pack and distributes it intelligently to everything else in the system. All of this power management is orchestrated by an STM32C0 microcontroller, the brain of the PowerBrick.
One challenge was implementing a proper standby solution. When turning off a modern Bluetooth speaker, it doesn’t actually shut down completely. A small portion of the electronics remain active, ready to instantly wake the entire system when needed. This enables features like alarm clocks or detecting when someone picks up the speaker, while replacing massive industrial power switches with an elegant button that doesn’t switch the current directly. But here’s the challenge: Standby must consume very little power. My solution was a dual-supply architecture. The PowerBrick provides two completely different power rails to the other bricks: An ultra-low-power 3.3V supply that never turns off, and a regular 5V supply that completely shuts down during standby. The 3.3V rail uses a specialized buck converter optimized for microamps. The Standby is so efficient, that the final speaker could sit unused for years and still wake up instantly from a set alarm.
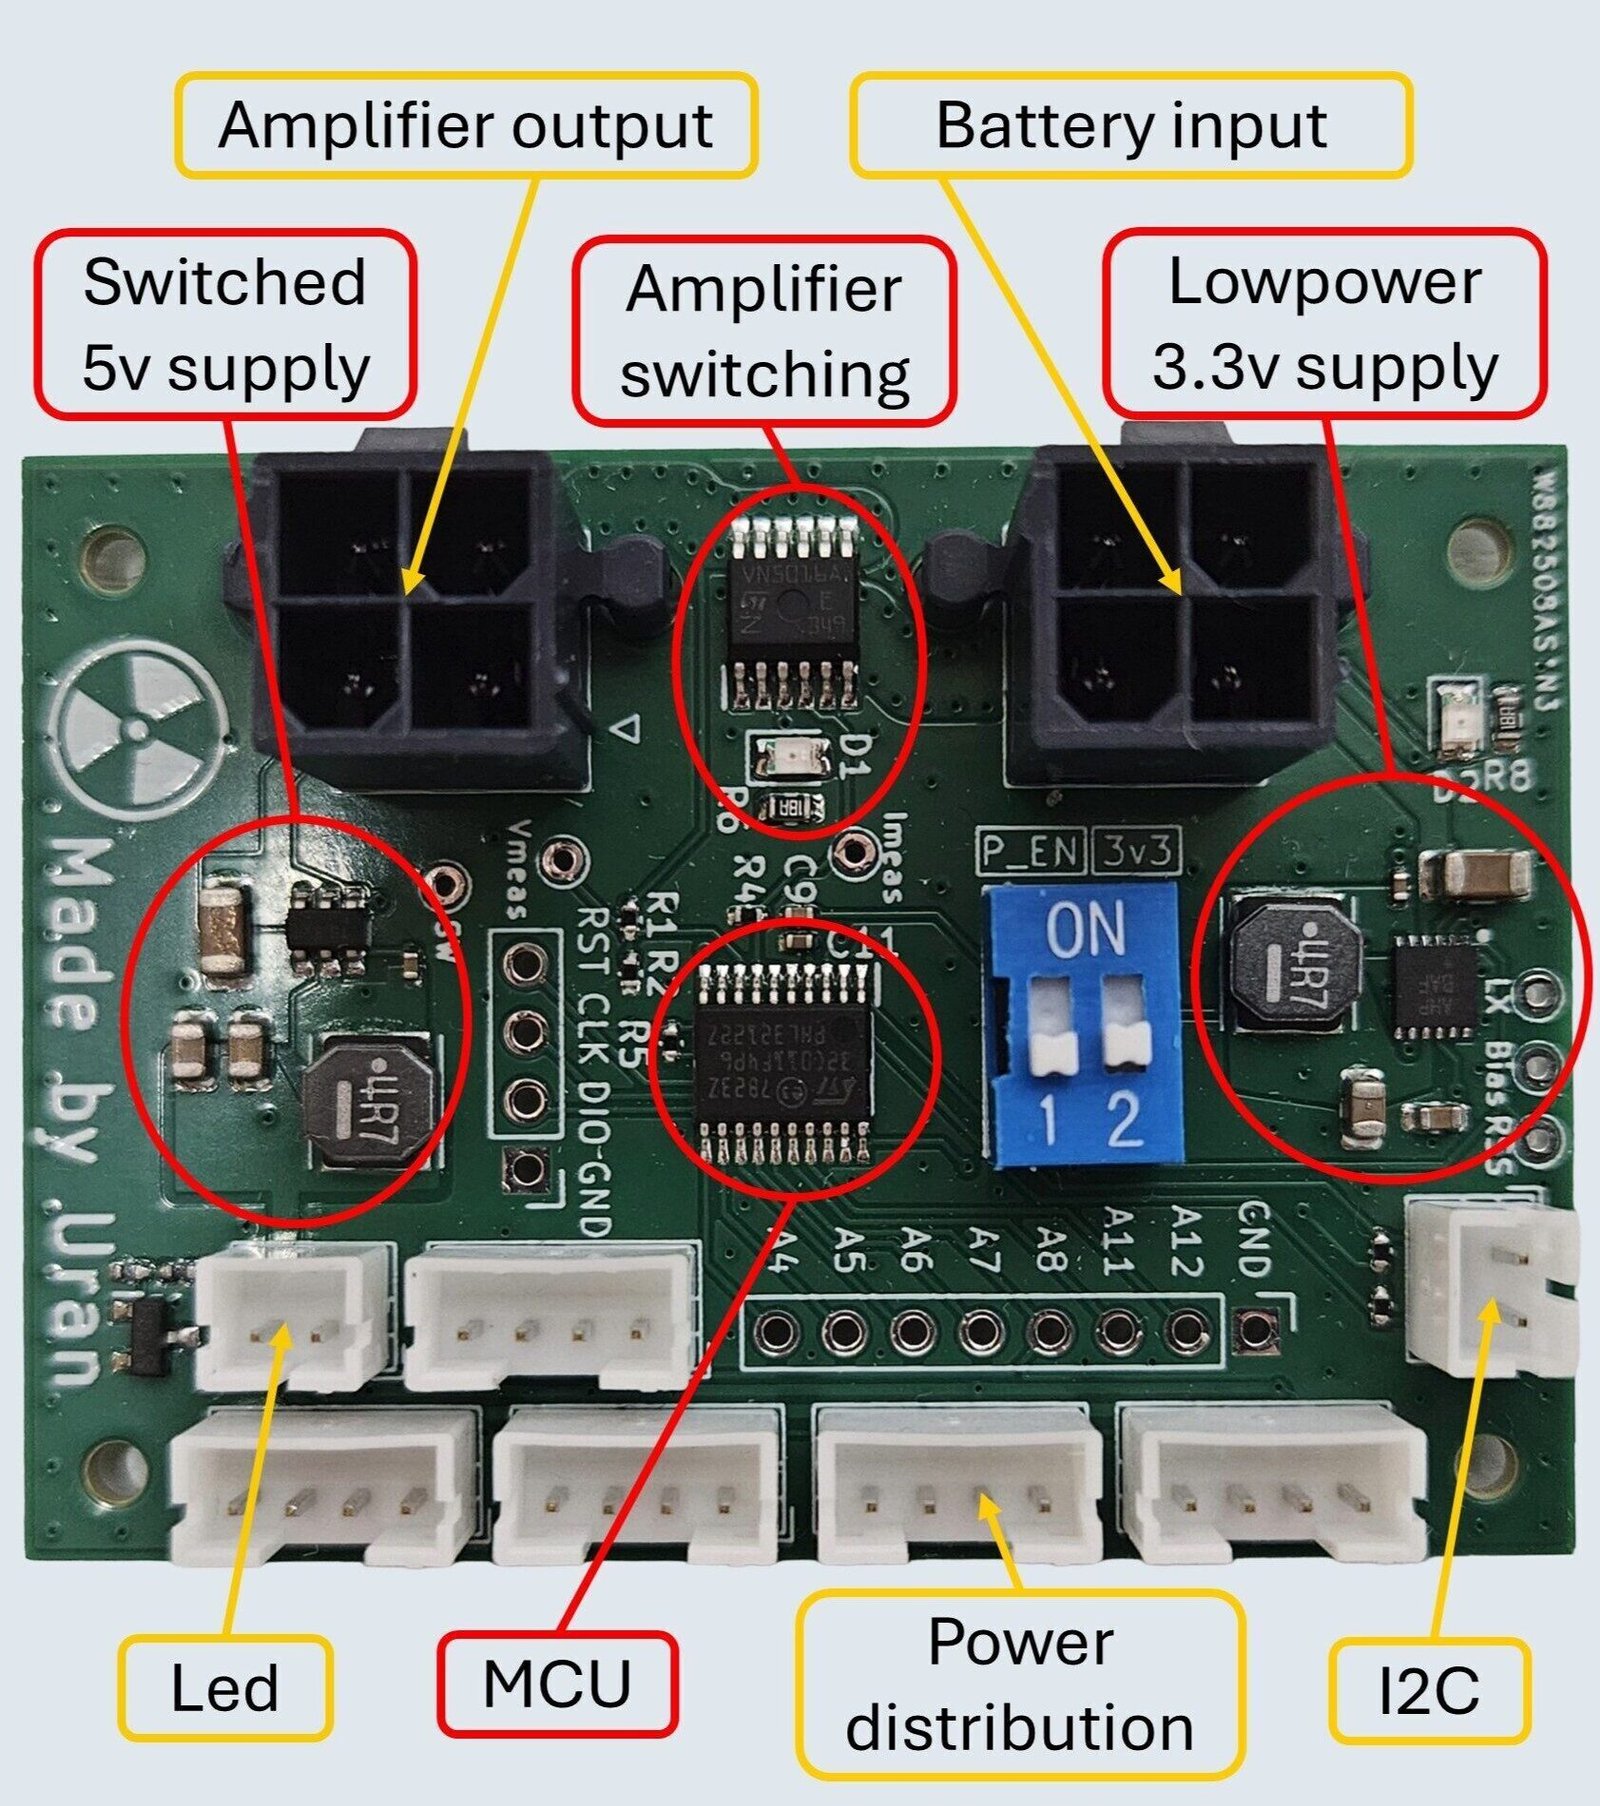
For the high-power amplifier switching, I used a high-side driver to switch the positive supply rail without needing a big circuit. This high-side driver also monitors exactly how much current the amplifier draws in real-time. To calculate the remaining battery percentage, the battery voltage is also monitored. All this data gets shared with other modules over I2C, enabling the system to make smart decisions about power usage. When the battery starts running low, the system could for example trigger a warning sound, reduce the bass to extend runtime, or disable power-hungry features.
The power distribution happens through a single JST-PH connector that is currently the standard power interface between the AudioBricks modules. The four-pin connector carries ground, the always-on 3.3V rail, the switchable 5V rail, and a wake-up signal that lets any brick bring the entire system online.
The PowerBrick ended up being one of those components that just works invisibly in the background, while still being critical as a basis for a lot of smart features in the system.
BluetoothBrick
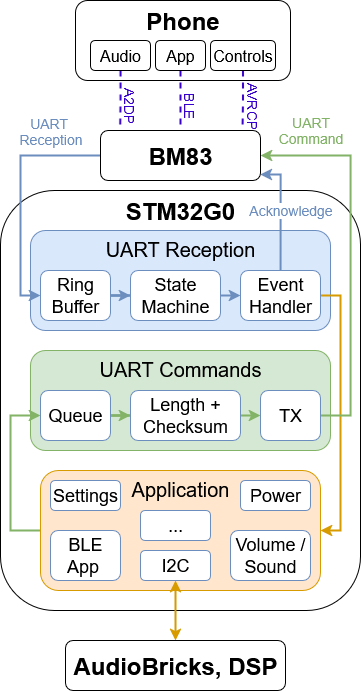
The BluetoothBrick serves as the brain of the entire AudioBricks ecosystem. Built around an STM32G0 microcontroller, it's the I2C master that handles communication between all other modules while also being responsible for audio streaming, app connectivity, and other features that I can only describe as questionably useful. But they seemed like great ideas at the time.
For the Bluetooth communication, I used a BM83 Bluetooth module. Getting this thing to behave properly was harder than I anticipated. The BM83 communicates over UART, which sounds straightforward until you dive into the reality of implementing the robust protocol with checksums, message acknowledgment, and proper error handling. The documentation was decent, but understanding the full protocol and implementing a reliable communication proved to be one of those tasks that look simple on paper but turn into hours of debugging. Miss a checksum or send messages too quickly, and the BM83 just stops responding entirely.
But the real complexity comes from managing multiple connection types simultaneously. The system handles classic Bluetooth audio through two protocols: A2DP for actual audio streaming and volume commands, plus AVRCP for transport controls like play, pause, and track switching. Meanwhile, it maintains a completely separate Bluetooth Low Energy connection the mobile app communication. Keeping track of all these connection states and managing reconnections required building a robust state machine.
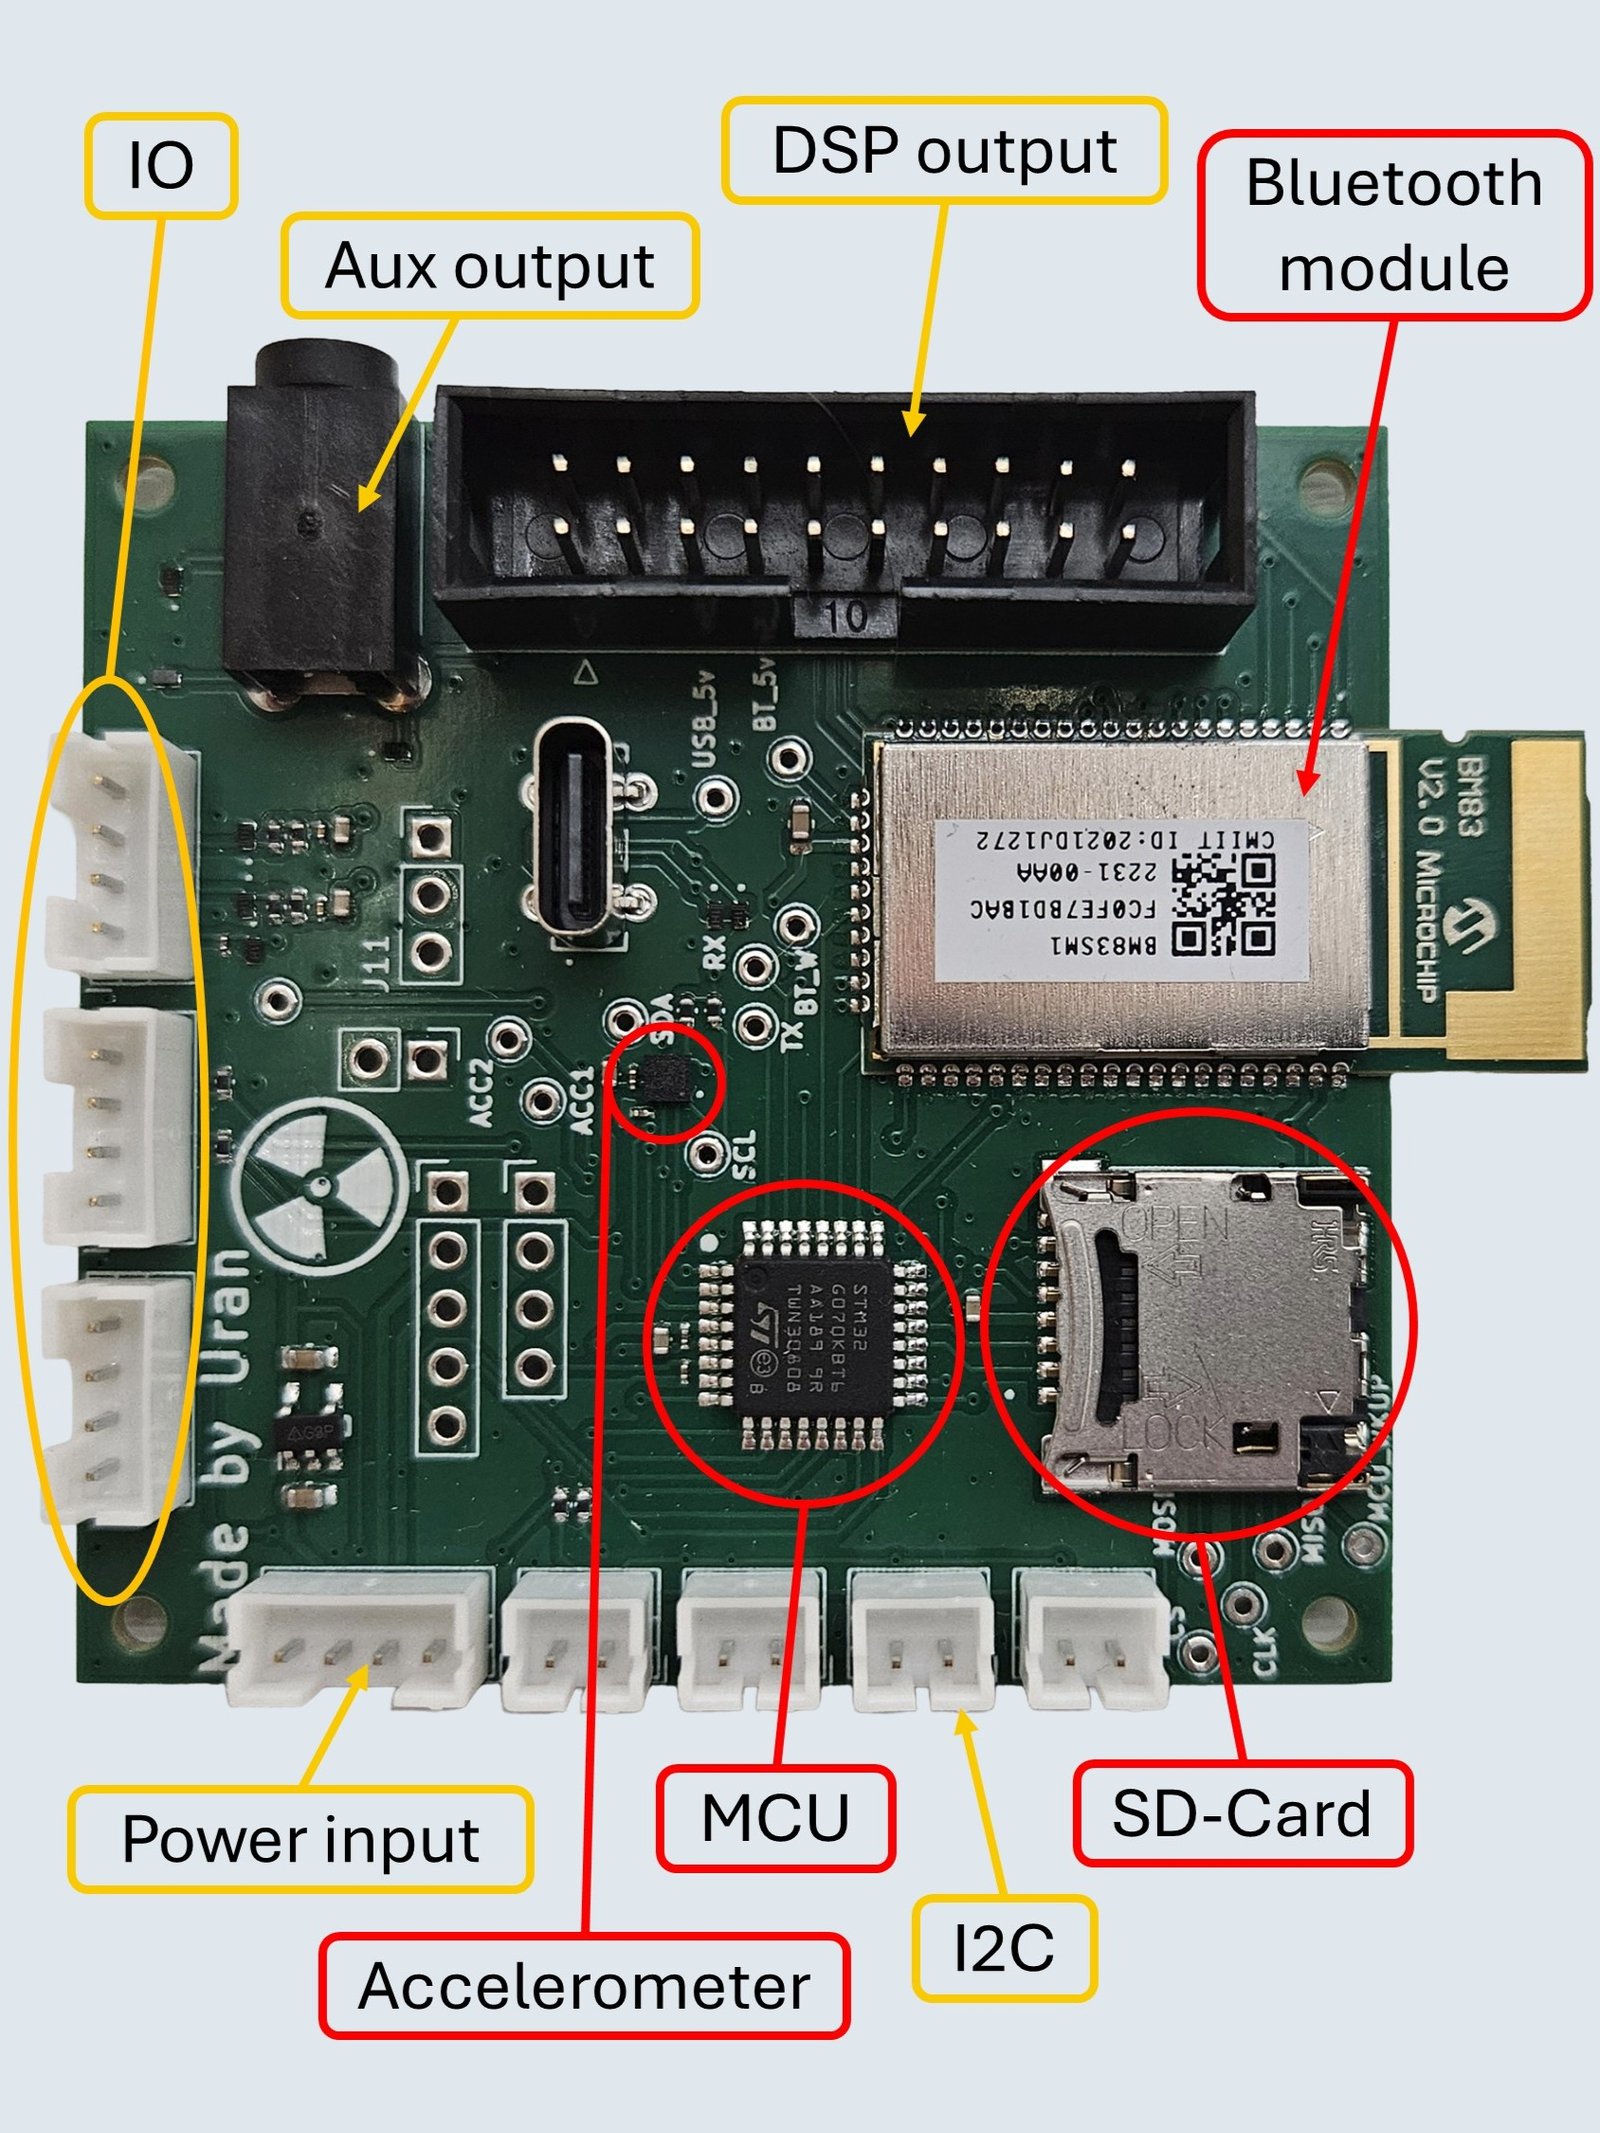
One feature I was particularly excited about was custom sounds for different system events like power on/off, Bluetooth connections, or when the phone gets too far away. I even included hidden easter eggs triggered by certain user actions. The plan was to store the configuration files and audio tracks on an SD card.
The SD card slot connects via SPI, and here's where things went sideways. Writing low-level SPI drivers from scratch proved far more complex than expected. Between initialization sequences, different SD card types, file systems, and error handling, I was deep in a rabbit hole consuming days with little progress.
Rather than let perfect be the enemy of functional, I added a DF-Player-Mini module for now. This board handles SD card audio playback and connects through a second UART channel. The audio feeds directly into the DSP, with my software automatically reducing music volume during system sounds. I also needed an alternative to system configurations I planned to store on the SD card. I discovered that my STM32G0 has no EEPROM. My inelegant solution? Use the VolumeBrick's EEPROM over I2C instead. This temporary solution is not perfect, but it works reliably, and sometimes that's exactly what's needed to keep moving forward.
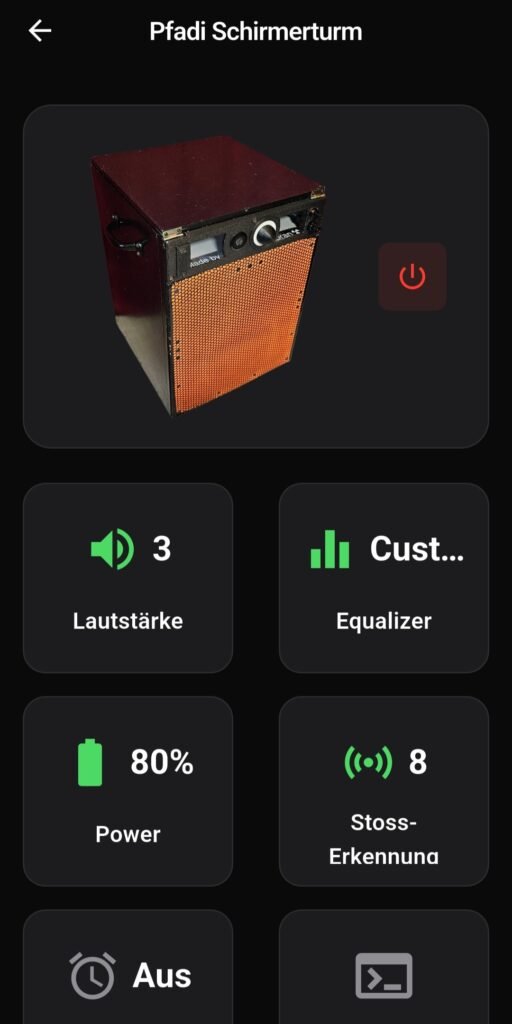
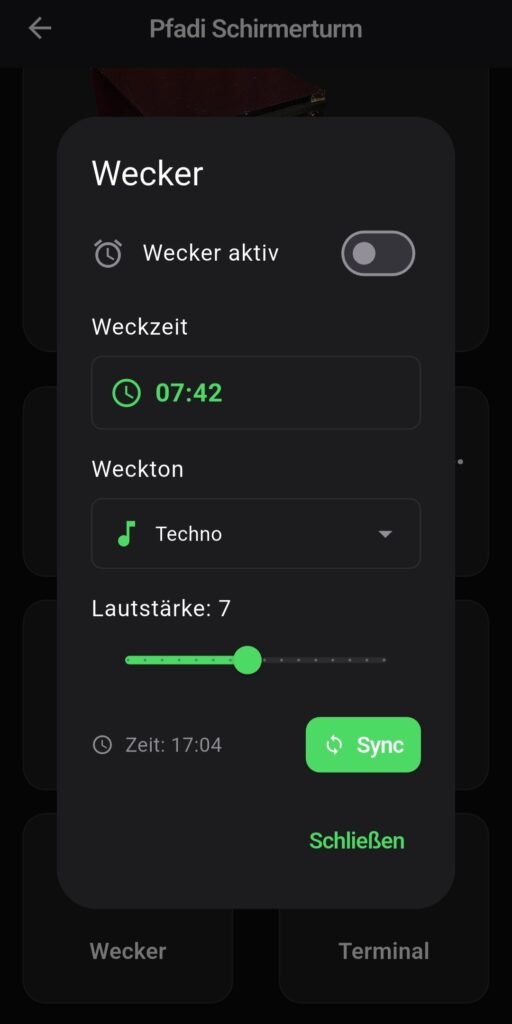
While physical controls handle the basics, the real customization happens through the mobile app. I wanted a system anyone could configure exactly how they want it, without writing a single line of code, enabling endless yet intuitive customization. The app, developed using Flutter, connects via Bluetooth Low Energy. This connection is completely separate from the audio streaming, so anyone can access it regardless of whose phone is playing music.
Volume control gets particularly interesting here. You can adjust levels even when you're not streaming audio, set maximum limits, and configure which devices actually control the volume: Only the physical knob while ignoring phone volume completely, only the streaming phone while the speaker knob does nothing, or both. The equalizer provides fine-tuning for the sound profile, the alarm clock can tear even the deepest sleeper out of bed, power management options let you configure automatic standby after inactivity, and the debug terminal helped me countless times during development. And yes, there's a dedicated settings panel for the screaming-on-impact feature, because surprisingly, speakers seem to produce their own vibrations. Who would have thought. Finding the sweet spot between "respond to actual impacts" and "scream on every bass drop" turned out to be trickier than expected.
I already have ideas for future app capabilities. Custom automation features could let users create their own behaviors and easter eggs without touching any code, opening up endless possibilities I haven't even imagined yet. Oh, and if you're wondering about the app's language being an interesting blend of Swiss German and German ... I just picked whichever phrase sounded better in the moment.

VolumeBrick
From the very beginning of this project, I had one non-negotiable requirement: There should be exactly one volume level across the entire system that works whether you're turning the physical knob or using your phone. Simple concept, surprisingly tricky to implement properly.
The traditional DIY approach would be to use a potentiometer, but that creates an immediate problem: Potentiometers have absolute positions, which can't be changed by software. The solution was to use a rotary encoder instead. Encoders only report relative movement, which is exactly what I needed. Turn it clockwise and the volume goes up, turn it counterclockwise and it goes down. The phone and knob stay perfectly synchronized because they're both just sending increment/decrement commands to the same underlying volume system.
I added a ring of LEDs around the encoder to provide immediate visual feedback of the current volume level. These LEDs show the actual system volume, creating a cohesive experience where the physical interface always reflects the actual state. Whether you adjust volume from the phone or the knob, the LED ring updates instantly. Getting this synchronization working seamlessly required careful coordination of different firmwares, but the end result feels completely natural. The VolumeBrick also supports various intuitive gestures: single click for play/pause, double-click to skip tracks, triple-click for previous track, and long press to enter pairing mode.
The VolumeBrick works closely with the BluetoothBrick to maintain perfect synchronization across all volume control methods. The BluetoothBrick handles the heavy lifting of communicating with the DSP, writing register values over I2C to adjust volume levels and implement the variable bass management system I described in the speakers post.
This coordination is more complex than it sounds. Directly writing DSP registers while audio is streaming creates extremely loud pop noises that would make users jump. They result from instant discontinuities in the audio signal that get amplified by later processing stages like high-pass filtering. The solution is a feature called "safeload," which allows you to stage register changes and apply them during zero-crossing points in the audio signal. Getting safeload working properly was quite difficult. The ADAU1701 DSP requires specific timing and sequencing for these operations, and I spent days debugging before finally achieving pop-free parameter changes during playback. The result is seamless: Turn the knob or adjust from your phone, let the system automatically manage bass levels, and everything transitions smoothly without any audible artifacts.
Press a blue button
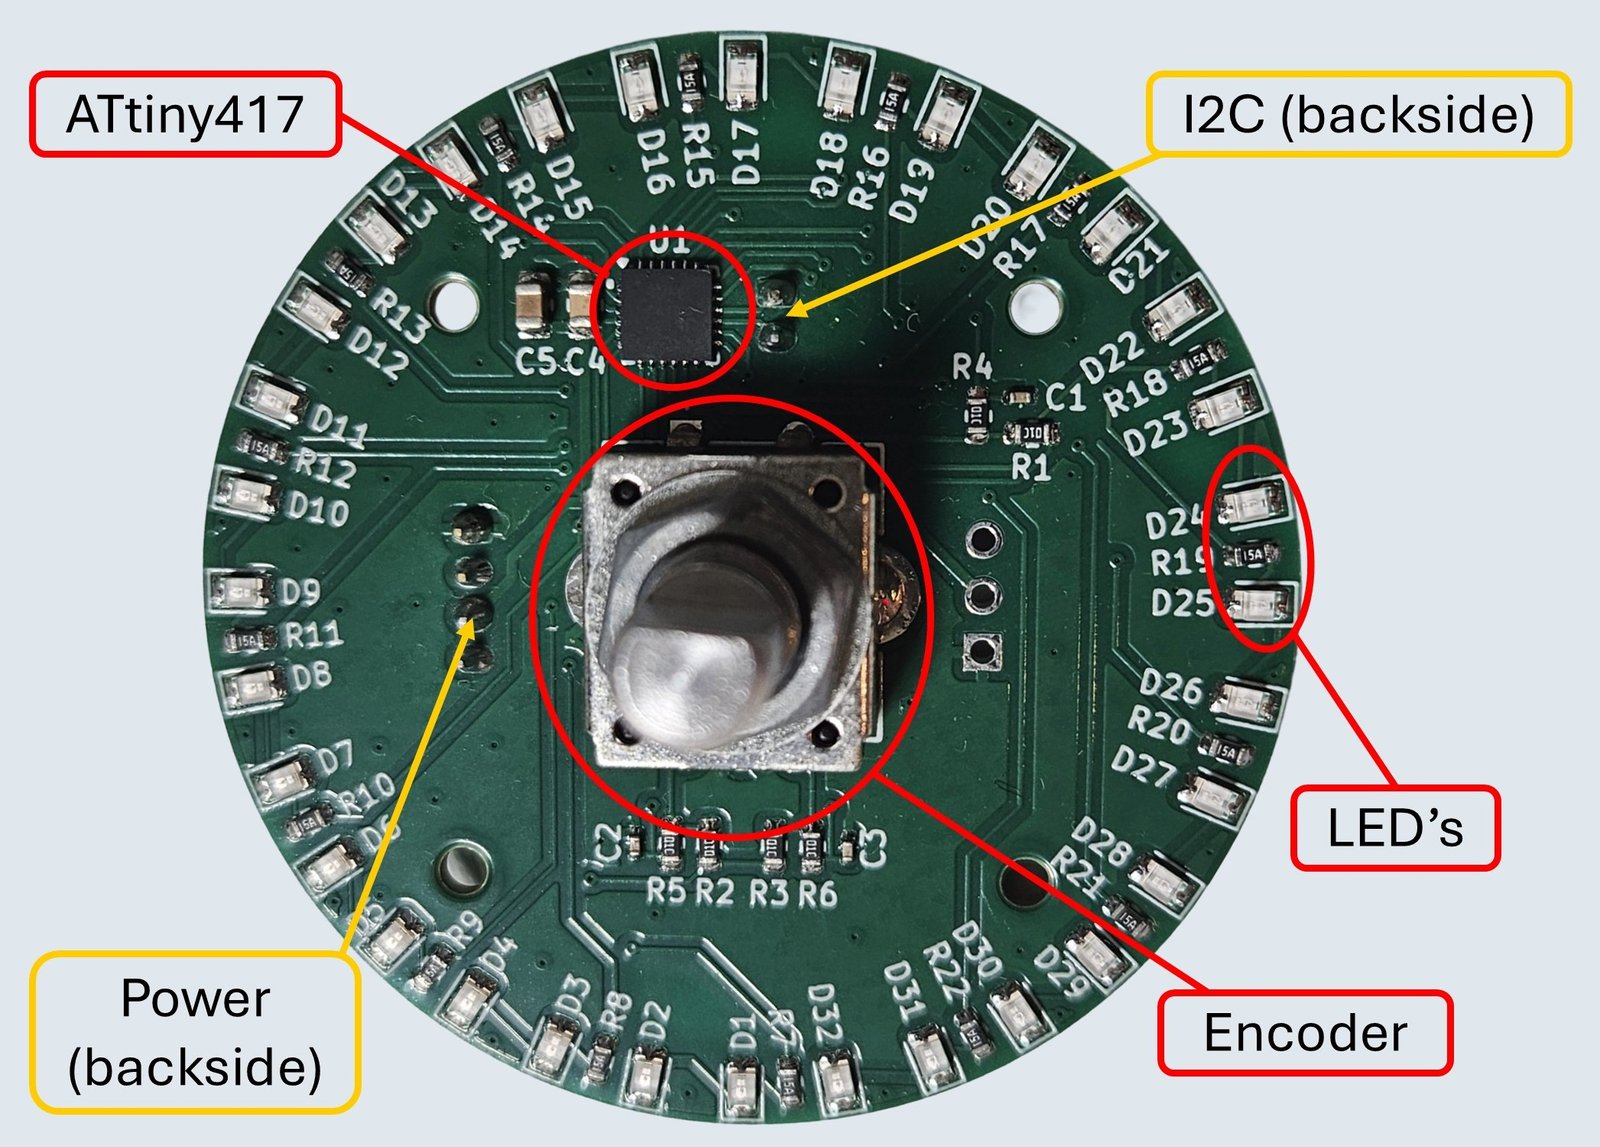
For the microcontroller, I chose an ATtiny417. It's cheap and has just enough pins for the encoder, i2c, and the LEDs. But most importantly, it can drive all those LEDs directly from its powerful GPIO pins without needing MOSFETs or dedicated LED drivers. The ATtiny417 runs on 5V with a generous overall current limit, meaning I could just use simple current-limiting resistors for each LED pair and call it done.
People now pick up the speaker, turn the knob, and everything responds exactly as they expect. That seamless integration took far more engineering effort than anyone realizes. Users don't even think about it, but that's kind of the whole point of intuitive design.